The Olive Branch: January

So the first month of 2017 has come and gone and if the photos I’ve taken this month are anything to go by, it seems like our January was mainly filled with baking sweet treats, eating aforementioned treats and then hiking in the countryside to make our bodies think the sweet treats never happened.

img_3435-2

At the beginning of the month I shared my go-to cookie recipe: Chocolate Chip Raisin Oat Cookies. Yummy, simple to make and not even really all that bad for you (ignore the butter, ignore the butter… what? Of course I wasn’t trying to send you a subliminal message). Bake up a batch and then you won’t have to offer your guests your kids’ Pez sweets as refreshment.

img_3541

Also, I tidied up Sophie and Tom’s shared bedroom so I could share this Kids’ Room Tour and it stayed tidy from the exact moment I finished tidying it until the exact moment the kids entered it. Sisyphus, I feel ya.

IMG_3461.jpg

We took a couple of lovely trips out of the city. This one was our hike at Yaqum Lake in the centre of Israel. It’s a lake that only exists in the winter, after the rains begin. Tom enjoyed scanning the wide skies for airplanes.

IMG_3697.jpg

I bought a new plant! Such an indulgence, I know. It’s a Mother-in-Law’s Tongue (Sanseviera) and here it is peeking out from behind the lamp. Apparently it’s one of those ones that’s impossible to kill. We’ll see. Already this month we had some crazy strong winds which literally dislodged our window boxes and smashed them onto the ground below (we live on the fourth floor). Only the lemon geranium survived… sniff sniff.

IMG_3618.jpg

We did another trip up to the Carmel region to Ramat Hanadiv, a nature park with formal gardens and a separate wilder section with hiking trails. We loved the rose garden, which was in full bloom – it’s always funny for me to see flowers and plants that I associate with summer thriving in the Mediterranean winter! By the way, the pink roses smelled the sweetest. No surprise there then. #ihavethisthingwithpink

IMG_3778.jpg

In important family news, Mr Olive’s sister gave birth to their first baby and I’m so looking forward to all the cuddles! I baked this Vegan Chilled Chocolate Torte with Toasted Hazlenut Crust to celebrate (my sister-in-law and her husband are vegan so we eat a lot of plant-based food in our family). I based the recipe on one from the first Oh She Glows cookbook (which was a gift from Ave, incidentally ♥ ♥ ♥ ). Let me know in the comments if you’d like me to post the recipe!

img_3765

And finally, right at the tail end of the month, I finally got round to posting the recipe for Savta Clara’s Tomato, Carrot and Rice Soup. It’s a winter warmer that packs a lemony peppery punch and it’s an old family recipe passed down by Mr Olive’s granny. Generations of soup-lovers can’t be wrong!

Apart from that I went on a girls’ karaoke night, had a date night with Mr Olive, added a few more rows to a scarf I’m knitting (first ever knitting project – wish me luck!), signed a fair few petitions – no need to guess the subject 😦 – and, as always, did a sh*tload of laundry!

So how about you? How was your start to 2017?

Em xx

Chocolate Chip Raisin Oat Cookies

These are my go-to cookies. I can make them without even looking at the recipe. Well, almost. Actually, I always look at the recipe. I’m pretty bad at remembering quantities of things. And counting. Let’s just say that I’ll never give Fermat a run for his money. Not at maths, anyway. I don’t know how he was at baking.

IMG_3443.jpg

The recipe in question comes from Julia Suddaby, one of my favourite artists, who also happens to be a delightful person and my mum’s best friend. I remember first eating (far too many of) these cookies as a child while visiting with Julia and her family at their home in the Essex countryside. They were such a hit with us kids on that visit that my mum copied down the recipe and started baking them for us. Now I bake them for my kids, for any kindergarten event where refreshments are required, for leaving parties, for unexpected guests, for expected guests, and just generally all the time, for no reason. Nobody ever gets bored of them and somebody always asks for the recipe.

IMG_3416.jpg

Julia’s original recipe source was Joy of Cooking, which she says was her favourite escapist reading material while living on a Belgian commune in 1975. She told me that the nostalgia of reading about 1950s American cocktail parties was the perfect balance to the environment in which she was then living, which she describes as, “the bohemian world of 1970s travellers and artistic Belgian aristocracy”.

img_3427

Despite not being very aristocratic, there are so many things to love about these cookies:

  1. They are absolutely, positively, unquestionably scrummy. Chocolatey, fruity, chewy, a little bit cakey, a little bit crumbly, and extremely satisfying without being overly rich or sweet.
  2. You don’t need any special equipment. Just a mixing bowl, a wooden spoon and a baking sheet.
  3. You are quite likely to have all or most of the ingredients in your cupboard already, which means you can have a batch baked and cooling on your counter (and smelling heavenly) within about 25 minutes. This is obviously a boon when you have people coming over for coffee in half an hour and nothing to offer them but Ninja Turtle Pez sweets. (This has never happened to me. Ok, this has definitely happened to me). Which brings me to…
  4. Even if you don’t have all the ingredients, the recipe is pretty forgiving. You can use just chocolate chips or just raisins or neither. You can sub nuts, seeds, desiccated coconut or whatever you fancy. I’ve made the cookies with flax egg and non-dairy butter for a vegan version. And I’ve made them with half self-raising and half all-purpose flour and they came out totally fine. Hooray for lenient cookie recipes!
  5. While they do contain a ton of butter (not literally – that would be gross), I would say they are on the healthy cookie spectrum. Only a half cup of brown sugar AND vast quantities of oats. In fact, you can rest safe in the knowledge that, while the butter may not be doing anything great for your cholesterol levels, the oats (as well as enhancing your immune system, providing wholegrain fiber, and protecting against heart disease) definitely are. So it all evens out in the end. Right? Right!

IMG_3429.jpg

The recipe has gone through a couple of changes on its journey from ’50s America to ’70s Europe to my little kitchen in Tel Aviv today. My original note-book scrawled recipe (entitled simply, ‘Cookies’, as if to emphasize that you really don’t need any other cookie recipe in your life), calls for margarine. I don’t tend to buy margarine and I like the rich flavour that butter brings to baking, but feel free to sub a trans-fat free margarine if that’s what rocks your casbah. I added a pinch of salt and some vanilla extract to the recipe because, you know. I give a quantity guideline here for the chocolate chips and raisins, although my original notes are unspecific and, to be honest, I usually just eyeball it.

And that’s it! If you don’t already have a go-to cookie recipe, then try these – maybe this is the ONE! And if you already have a go-to cookie recipe, then try these anyway! Because they are freaking delicious.

IMG_3436.jpg

Chocolate Chip Raisin Oat Cookies

MAKES APPROX. 16 COOKIES

PREPARATION AND BAKE TIME: 25-30 MINS

Ingredients

100g / 1/2 cup / 3.5 oz brown sugar

175g / 3/4 cup / 6.17 oz butter at room temperature

2 free-range eggs

128g / 1 cup / 4.5 oz self-raising flour

192g / 1.5 cups / 6.75 oz jumbo rolled oats

Pinch of salt

1 tsp vanilla extract

117g / 2/3 cup / 4.12 oz dark chocolate chips

100g / 2/3 cup / 3.5 oz raisins


Method

  1. Pre-heat oven to 180C (356F / Gas Mark 4).
  2. In a large bowl, beat together the sugar and butter, using a wooden spoon, until well combined.
  3. Add the eggs, flour, oats, salt and vanilla and mix until just combined.
  4. Add the chocolate chips and raisins and mix again. (Not too much.)
  5. Put rounded tablespoons of the mix onto an ungreased cookie sheet and bake in the centre of the oven for 15 minutes.
  6. Let cool for 10 minutes before gobbling them all up. The cookies will keep in an airtight container out of the fridge. I can’t say how long for because ours always mysteriously disappear before I have a chance to carry out my research. 😉


Decadent Fudgy Brownies

When I was in my early 20s I worked as a sous chef in the kitchen of a well-established and well-loved London deli. Most of the time it was just me and three super fun and sweet Algerian guys bumping into each other in the tiny basement kitchen and pumping out Bob Marley or Manu Chao for 10 hours a day. Oh yeah, and we also cooked a little bit.

IMG_2495.jpg

One of the things that we cooked or rather, baked, on an almost daily basis was the shop’s trademark brownies. These brownies were legendary. People would make pilgrimages from places as far away as Neasden to wrap their choppers around our brownies. Probably. In any case, we sold stacks of them every day to the point where pretty much everybody who worked in the deli (including the floor managers and definitely including the kitchen porter) knew the recipe and could be called on to enter the breach and whip up a double batch at any given moment if stocks got low.

IMG_2425.jpg

Fast forward ten years or so and I am about to set about the task of making my two year old daughter’s birthday cake for her kindergarten party. Having been rather absent in the birthday-cake-baking arena up until this moment (sorry, nearest and dearest) I rack my brains to come up with a source for a great chocolate cake recipe that will satisfy a bunch of sugar fiends, um, sorry, I mean toddlers. My extremely clever husband suggests the legendary brownies (having been rather partial to their decadent fudginess himself, back in the day). Aha! I thought. What a clever husband I have!

IMG_2426.jpg

IMG_2429.jpg

So I locate the recipe (which I handily noted down all those years ago) spend a bunch of money on unreasonable amounts of chocolate and butter (I did say they were decadent) only to eventually pull out of the oven a tray of something hard, crumbly and somewhat charred smelling. I don’t know what it was but it definitely wasn’t brownies. As I stirred my disappointed tears into the batter of the rather underwhelming sheet cake which was to replace the paving stone I had just inadvertently baked, I racked my brains to answer the question: WHAT? WENT? WRONG? I scanned the recipe. I gnawed on a chunk of singed brick (chocolate flavour). I questioned my sanity. It was just as I was cracking a lovely unsuspecting organic egg into the cake batter of disillusionment that it dawned on me. Eggs. Do brownies require eggs? Yes. Were eggs listed as an ingredient in my hastily scrawled notes from 10 years previously? Nah-uh. Hence: candied concrete slab. (Well, of course we ate it).

img_2432


IMG_2440.jpg

IMG_2442.jpg

And so, after baking a succession of rather more successful birthday cakes over the last couple of years (thanks to birthing an additional child… and also to the fact that one birthday party per person per year never seems to be enough these days… this year Sophie turned 4 and I ended up baking her 3 birthday cakes plus a batch of cookies… do we now count out a person’s age in batches of baked goods received instead of number of candles? Is someone going to bake me 39 different varieties of confection for my next birthday? Please?  But I digress…) I have worked up the courage to give the legendary brownies another crack.

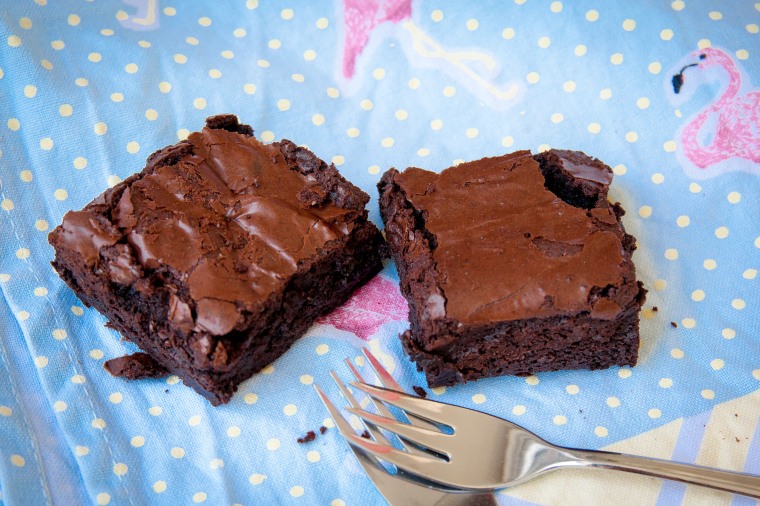
And I’ll remember to give some eggs a crack this time round too. How many, you ask innocently? Um, six. And, no, that’s not a typo. It’s the number of eggs it took to get the batter to pourable consistency. Extra vanilla and salt seemed obvious additions, plus some research into the benefits of whipping the eggs with the sugar have produced, I think, a delectably decadent and fabulously fudgy brownie.

IMG_2490.jpg

Decadent Fudgy Brownies

Makes 24 smallish brownies

Bake time: 30-40 mins

This article and also this one were invaluable during my eggs-perimentations with different quantities, bake times and so on, and were also sources of general brownie wisdom.

Ingredients

Oil for coating baking tray

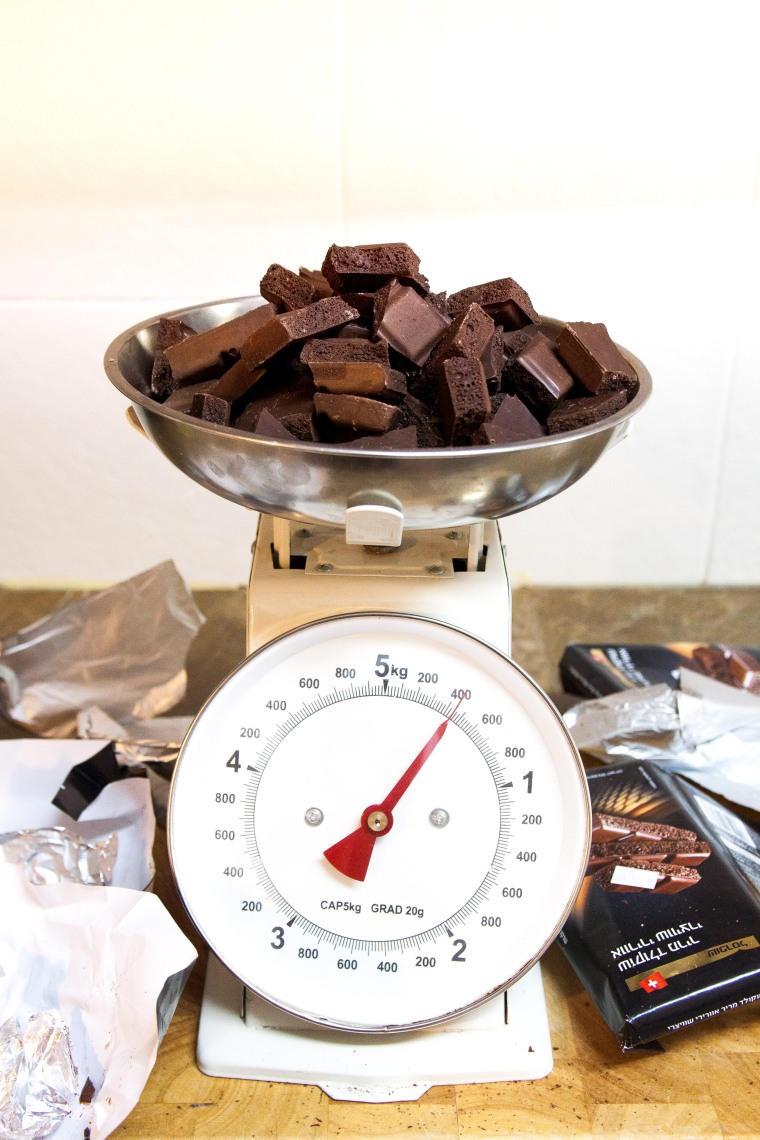
450g (15.9oz) bitter chocolate

450g (15.9oz) unsalted butter

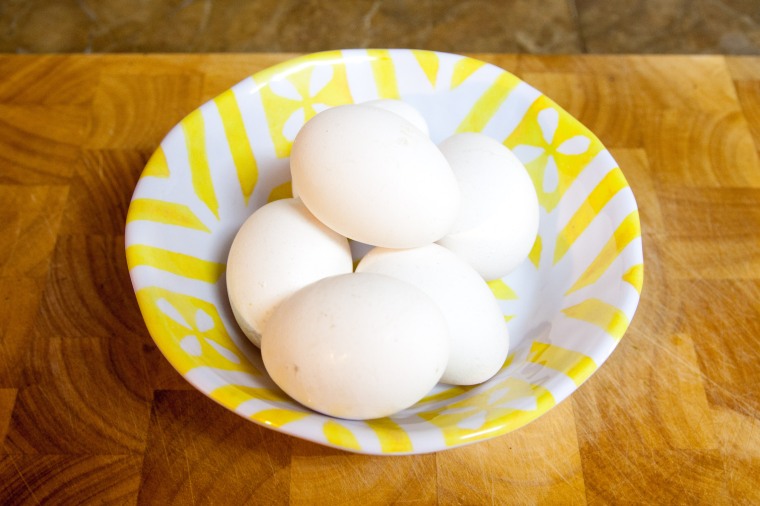
6 large free-range eggs

500g (17.6oz) white sugar

2 tsp vanilla extract

150g (5.3oz) all-purpose flour

150g (5.3oz) cocoa powder

¼ tsp table salt


Method

  1. Pre-heat oven to 180C (356F / Gas Mark 4). Lightly oil a 33cm x 23cm (13 x 9 inch) baking pan and lay two pieces of parchment paper crossways inside so that there is an overhang of paper on each side of the pan. This will help you lift the brownies out of the pan when they’re done. Lightly oil the parchment paper.
  2. Break up the chocolate into smallish pieces and melt using your preferred method. I used a bain-marie but you could also do it in the microwave.
  3. Melt the butter in a large saucepan over a low heat.
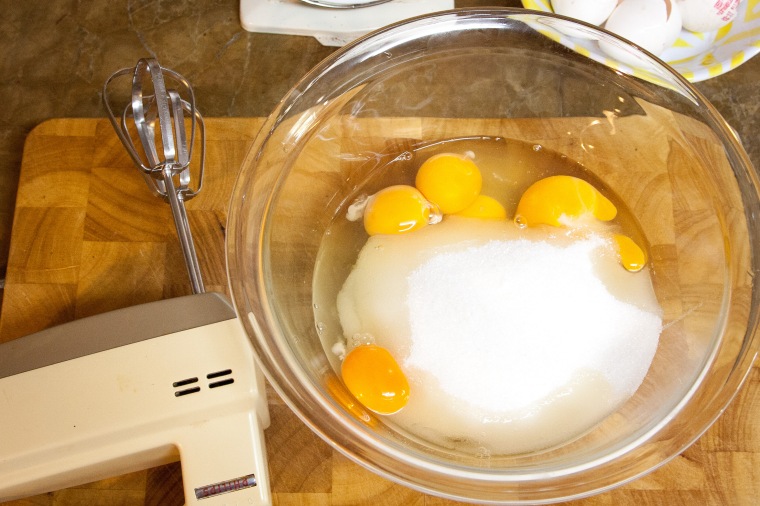
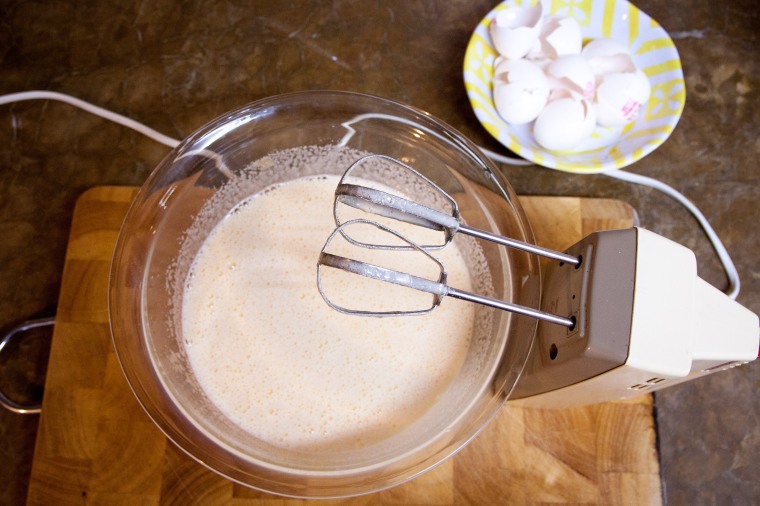
  4. Use either a stand mixer or a large bowl and an electric whisk to whisk together the eggs, sugar and vanilla. Keep at it for a good minute or so, until everything is combined and has reached a smooth creamy consistency.
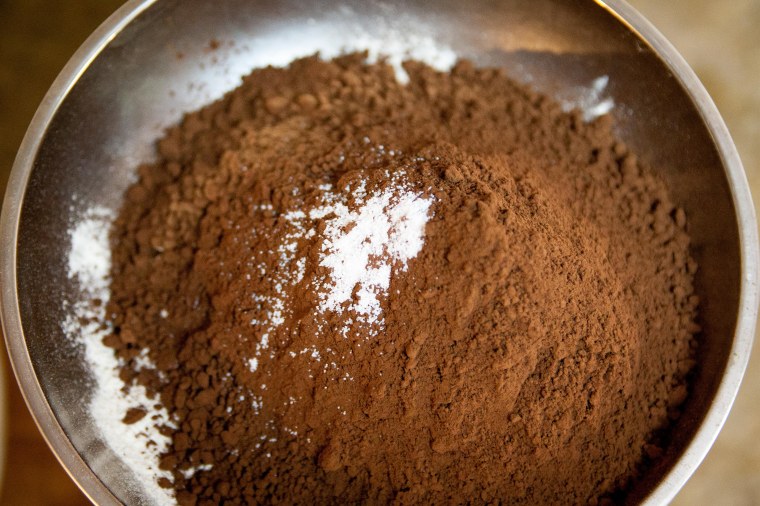
  5. In a large bowl, sift together the all-purpose flour, cocoa powder and salt.
  6. Add half the flour mixture to the egg mixture and whisk until combined. Scrape down the bowl and then add the other half of the flour mixture, whisking until everything is very well mixed and you have a thick shiny batter.
  7. Add the melted butter and whisk in.
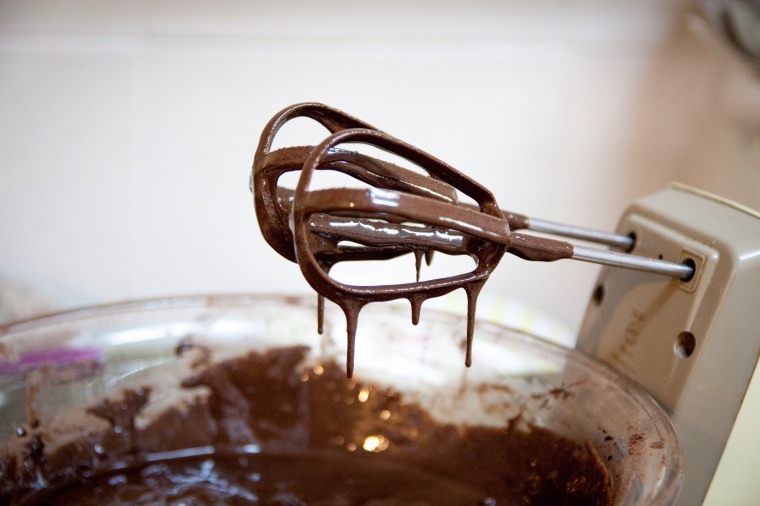
  8. Add the melted chocolate to the batter. If you used a bain-marie to melt the chocolate, be careful – the bowl will be very hot! The chocolate will set as it cools so make sure you whisk it in quickly and thoroughly, for at least a minute, so that the chocolate will be evenly distributed.
  9. Pour the batter evenly into your lined baking pan and bake in the center of the oven for 35-45 minutes. You can test doneness by sticking a toothpick into the center of the pan. What you’re looking for is for it to come out with some sticky crumbs on it. If the toothpick comes out with wet batter on it, leave the pan in the oven for a bit longer; if it comes out clean, the brownies will be dryer and won’t have the fudgy consistency you’re looking for.
  10. When done, take the brownies out of the oven and allow to cool in the pan. Only when completely cooled, lift the brownies out of the pan using the parchment paper wings, peel off the paper and cut into squares.
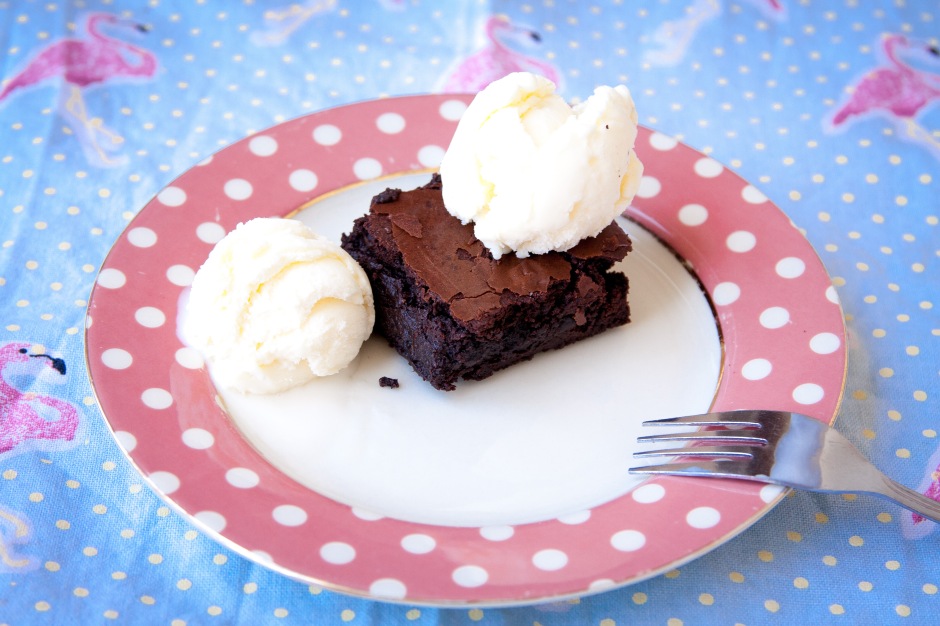
  11. Brownies will keep out of the fridge in a tupperware-type container for a good few days and probably up to a week. Try warming one in the microwave for 30 seconds and serving with vanilla ice-cream. Yum!